OnsetDocker: Difference between revisions
No edit summary |
No edit summary |
||
| (One intermediate revision by the same user not shown) | |||
| Line 1: | Line 1: | ||
Docker can be really helpful while developing your own server but it can be awesome when you are managing servers : cpu and ram limitations and reservations, crash management, auto restart, security and isolation. Let's see how we can deal with it. | Docker can be really helpful while developing your own server but it can be awesome when you are managing servers : cpu and ram limitations and reservations, crash management, auto restart, security and isolation. Let's see how we can deal with it. | ||
A working project is available here : https://github.com/soljian/OnsetDemoDocker Feel free to use it and customize it. | |||
== Development stack == | == Development stack == | ||
| Line 72: | Line 74: | ||
</syntaxhighlight> | </syntaxhighlight> | ||
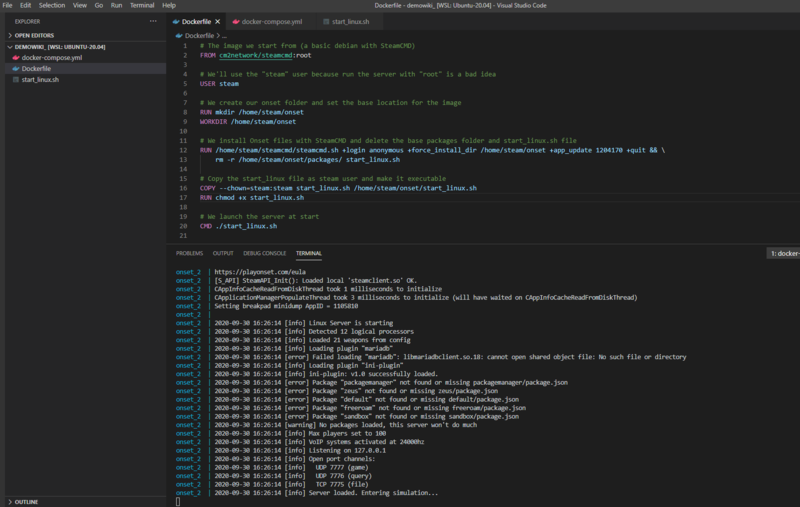
We are | We are now fine ;) | ||
[[File:good1.png|800px|none]] | [[File:good1.png|800px|none]] | ||
=== Add configuration and some packages === | |||
Now we are running a server in Docker, let's see how to configure it and add some packages to play around. | |||
For this part we are going to add the Sandbox from Digital and Logic you can find here : https://github.com/AliLogic/onset-sandbox-editor | |||
1. Create a folder called <code>packages</code> and place <code>sandbox</code> in it. | |||
2. To load the packages folder into our container, we have to specify <code>volumes</code> in our docker-compose.yml file. Add those lines at line 16 : (be carefull of indentation, see the screen capture later) | |||
<syntaxhighlight> | |||
volumes: | |||
- "./packages:/home/steam/onset/packages" | |||
</syntaxhighlight> | |||
This will load the packages folder we created to the /home/steam/onset/packages folder in the container. So our server will be able to load it. | |||
3. Create a <code>server_config.json</code> file and configure it as you wish. See this : https://dev.playonset.com/wiki/server_config | |||
<syntaxhighlight lang="json"> | |||
{ | |||
"servername": "Demo Docker", | |||
"servername_short": "Demo", | |||
"gamemode": "Roleplay", | |||
"website_url": "", | |||
"ipaddress": "0.0.0.0", | |||
"port": 7777, | |||
"maxplayers": 20, | |||
"password": "", | |||
"timeout": 15000, | |||
"iplimit": 5, | |||
"masterlist": false, | |||
"plugins": [ | |||
"ini-plugin" | |||
], | |||
"packages": [ | |||
"sandbox" | |||
], | |||
"voice": true, | |||
"voice_sample_rate": 48000, | |||
"voice_spatialization": true, | |||
"pools": { | |||
"player": { | |||
"distance": 40000.0, | |||
"update_rate": 0.05 | |||
}, | |||
"voice": { | |||
"distance": 2000.0, | |||
"update_rate": 0.8 | |||
}, | |||
"vehicle": { | |||
"distance": 40000.0, | |||
"update_rate": 0.1 | |||
}, | |||
"object": { | |||
"distance": 40000.0, | |||
"update_rate": 0.1 | |||
}, | |||
"npc": { | |||
"distance": 12000.0, | |||
"update_rate": 0.1 | |||
}, | |||
"pickup": { | |||
"distance": 12000.0, | |||
"update_rate": 0.1 | |||
}, | |||
"door": { | |||
"distance": 12000.0, | |||
"update_rate": 0.1 | |||
}, | |||
"text3d": { | |||
"distance": 12000.0, | |||
"update_rate": 0.1 | |||
} | |||
} | |||
} | |||
</syntaxhighlight> | |||
4. Add the server_config.json file to the volumes list on the docker-compose.yml. Add this on line 18 | |||
<syntaxhighlight> | |||
- "./server_config.json:/home/steam/onset/server_config.json" | |||
</syntaxhighlight> | |||
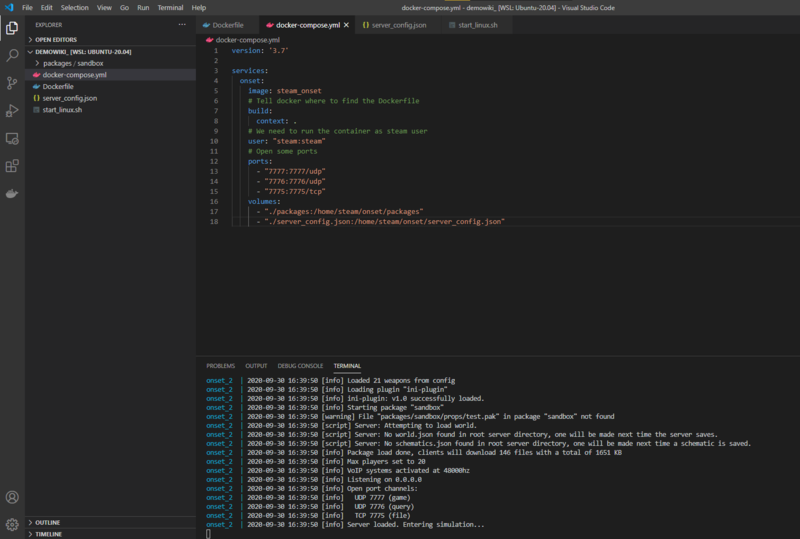
We're done configuring and adding packages, you can now run your server with <code>docker-compose up --build</code> and see this : | |||
/!\ Be careful of the indentation ! | |||
[[File:running.png|800px]] | |||
== Docker caveats and server list visibility == | |||
As the containers are not aware of the host configuration, if you have a custom network configuration like for example if you run many IPs to your server, you'll not be able to choose the good IP with this configuration. | |||
To resolve it, Talos updated some things on the server (this should be released soon) to allow server owners to put the IP you want to in the <code>ipaddress</code> parameter in the server_config file. That way, you'll have a warning saying the IP cannot be bound and fallback to 0.0.0.0. But don't be afraid, the master server will be in touch of wich IP you are using and show your server in the list. | |||
Be carefull to specify the corrects ports in your server_config AND your docker-compose files. | |||
In the docker-compose file, the port on the left is the published one, the one on the right is the target one. | |||
Latest revision as of 17:00, 30 September 2020
Docker can be really helpful while developing your own server but it can be awesome when you are managing servers : cpu and ram limitations and reservations, crash management, auto restart, security and isolation. Let's see how we can deal with it.
A working project is available here : https://github.com/soljian/OnsetDemoDocker Feel free to use it and customize it.
Development stack
For this guide we are going to create a brand new server folder.
1. Start with creation of the Dockerfile file and put the content below
# The image we start from (a basic debian with SteamCMD)
FROM cm2network/steamcmd:root

# We'll use the "steam" user because run the server with "root" is a bad idea
USER steam

# We create our onset folder and set the base location for the image
RUN mkdir /home/steam/onset
WORKDIR /home/steam/onset

# We install Onset files with SteamCMD and delete the base packages folder
RUN /home/steam/steamcmd/steamcmd.sh +login anonymous +force_install_dir /home/steam/onset +app_update 1204170 +quit && \
    rm -r /home/steam/onset/packages/

# We launch the server at start
CMD ./start_linux.sh
2. Next, we need a docker-compose.yml file to setup our environment
version: '3.7'

services:
  onset:
    image: steam_onset
    # Tell docker where to find the Dockerfile
    build:
      context: .
    # We need to run the container as steam user
    user: "steam:steam"
    # Open some ports
    ports:
      - "7777:7777/udp"
      - "7776:7776/udp"
      - "7775:7775/tcp"
2.b. We can run the server now. You can use docker-compose up --build to try it out but we are going to have a error :

This is because of the new console input feature. To disable it, let's add a start_linux.sh to replace the base one :
export LD_LIBRARY_PATH=$LD_LIBRARY_PATH:.
./OnsetServer --noinput
2.c. We now have to copy this file in our container at build. Update the Dockerfile at line 12.
# We install Onset files with SteamCMD and delete the base packages folder and start_linux.sh file
RUN /home/steam/steamcmd/steamcmd.sh +login anonymous +force_install_dir /home/steam/onset +app_update 1204170 +quit && \
    rm -r /home/steam/onset/packages/ start_linux.sh

# Copy the start_linux file as steam user and make it executable
COPY --chown=steam:steam start_linux.sh /home/steam/onset/start_linux.sh
RUN chmod +x start_linux.sh

# We launch the server at start
CMD ./start_linux.sh
We are now fine ;)

Add configuration and some packages
Now we are running a server in Docker, let's see how to configure it and add some packages to play around.
For this part we are going to add the Sandbox from Digital and Logic you can find here : https://github.com/AliLogic/onset-sandbox-editor
1. Create a folder called packages and place sandbox in it.
2. To load the packages folder into our container, we have to specify volumes in our docker-compose.yml file. Add those lines at line 16 : (be carefull of indentation, see the screen capture later)
volumes:
      - "./packages:/home/steam/onset/packages"
This will load the packages folder we created to the /home/steam/onset/packages folder in the container. So our server will be able to load it.
3. Create a server_config.json file and configure it as you wish. See this : https://dev.playonset.com/wiki/server_config
{
	"servername": "Demo Docker",
	"servername_short": "Demo",
	"gamemode": "Roleplay",
	"website_url": "",
	"ipaddress": "0.0.0.0",
	"port": 7777,
	"maxplayers": 20,
	"password": "",
	"timeout": 15000,
	"iplimit": 5,
	"masterlist": false,
	"plugins": [
		"ini-plugin"
	],
	"packages": [
        "sandbox"
	],
	"voice": true,
	"voice_sample_rate": 48000,
	"voice_spatialization": true,
	"pools": {
		"player": {
			"distance": 40000.0,
			"update_rate": 0.05
		},
		"voice": {
			"distance": 2000.0,
			"update_rate": 0.8
		},
		"vehicle": {
			"distance": 40000.0,
			"update_rate": 0.1
		},
		"object": {
			"distance": 40000.0,
			"update_rate": 0.1
		},
		"npc": {
			"distance": 12000.0,
			"update_rate": 0.1
		},
		"pickup": {
			"distance": 12000.0,
			"update_rate": 0.1
		},
		"door": {
			"distance": 12000.0,
			"update_rate": 0.1
		},
		"text3d": {
			"distance": 12000.0,
			"update_rate": 0.1
		}
	}
}
4. Add the server_config.json file to the volumes list on the docker-compose.yml. Add this on line 18
- "./server_config.json:/home/steam/onset/server_config.json"We're done configuring and adding packages, you can now run your server with docker-compose up --build and see this :
/!\ Be careful of the indentation !
Docker caveats and server list visibility
As the containers are not aware of the host configuration, if you have a custom network configuration like for example if you run many IPs to your server, you'll not be able to choose the good IP with this configuration.
To resolve it, Talos updated some things on the server (this should be released soon) to allow server owners to put the IP you want to in the ipaddress parameter in the server_config file. That way, you'll have a warning saying the IP cannot be bound and fallback to 0.0.0.0. But don't be afraid, the master server will be in touch of wich IP you are using and show your server in the list.
Be carefull to specify the corrects ports in your server_config AND your docker-compose files.
In the docker-compose file, the port on the left is the published one, the one on the right is the target one.

