Custom Maps: Difference between revisions
No edit summary |
No edit summary |
||
| Line 4: | Line 4: | ||
Head over to [[Modding]] to get started with setting up the Unreal Editor. | Head over to [[Modding]] to get started with setting up the Unreal Editor. | ||
Create a new plugin folder as described on the page above. Your map and all of it's assets (meshes, materials, textures, etc.) must also reside | Create a new plugin folder as described on the page above. Your map and all of it's assets (meshes, materials, textures, etc.) must also reside in this folder. | ||
To package the map as a pak follow the procedure "Package your content" as described on the page above. | To package the map as a pak, follow the procedure "Package your content" as described on the page above. | ||
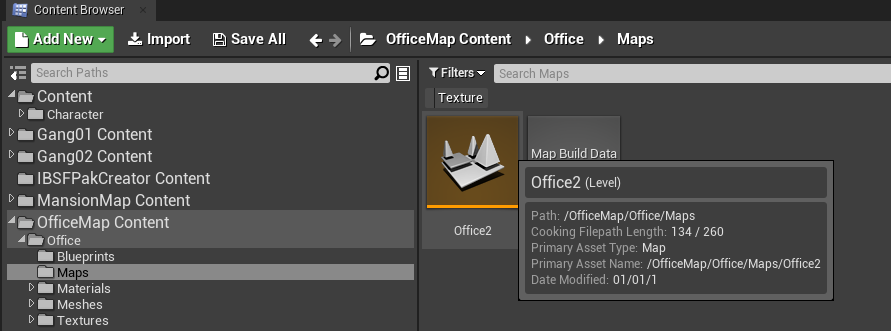
This is how it should look like in the Editor: | This is how it should look like in the Editor: | ||
| Line 12: | Line 12: | ||
== Loading a custom map == | == Loading a custom map == | ||
At first the pak file with the map must be loaded | At first, the pak file with the map must be loaded by the [[LoadPak]] function. | ||
Then in order to load it, the player must reconnect to the server. The function [[ConnectToServer]] has a parameter to specify the new map. | Then, in order to load it, the player must reconnect to the server. The function [[ConnectToServer]] has a parameter to specify the new map. | ||
The game will load the map and then connect to the server again. | The game will load the map and then connect to the server again. | ||
A reconnection is required because existing actors and entities on the map (vehicles, objects etc.) are being destroyed by the engine when a new map loads. This method is also the standard way Unreal handles level/map changes. | A reconnection is required because existing actors and entities on the map (vehicles, objects etc.) are being destroyed by the engine when a new map loads. This method is also the standard way Unreal handles level/map changes. | ||
Revision as of 14:37, 17 September 2020
Since Onset 1.3.0 you can load your own Unreal Maps/Levels.
Creating your own map
Head over to Modding to get started with setting up the Unreal Editor.
Create a new plugin folder as described on the page above. Your map and all of it's assets (meshes, materials, textures, etc.) must also reside in this folder. To package the map as a pak, follow the procedure "Package your content" as described on the page above.
This is how it should look like in the Editor:
Loading a custom map
At first, the pak file with the map must be loaded by the LoadPak function. Then, in order to load it, the player must reconnect to the server. The function ConnectToServer has a parameter to specify the new map. The game will load the map and then connect to the server again. A reconnection is required because existing actors and entities on the map (vehicles, objects etc.) are being destroyed by the engine when a new map loads. This method is also the standard way Unreal handles level/map changes.
In a future update a function to seamlessly load a new level might be added. Unfortunately in the current engine version this approach is a bit broken.
Example Office Map pak file: https://drive.google.com/file/d/1oRrnx4MlWpfnW-GNTdQGmfeetOyqlxgN/view?usp=sharing
Make sure to add the OfficeMap.pak to your package.json.
AddEvent("OnPackageStart", function()
	print("OnPackageStart")
	print(GetWorld():GetMapName())

      -- If the current map is not the Office2 map then load it.
	if GetWorld():GetMapName() ~= "Office2" then
		LoadPak("OfficeMap", "/OfficeMap/", "../../../OnsetModding/Plugins/OfficeMap/Content/")

		local mapname = "/OfficeMap/Office/Maps/Office2"
		ConnectToServer(GetServerIP(), GetServerPort(), "", mapname)
	end
end)
When a player quits playing on your server the game will load the original map again. If you would like to load the original map for a player. You can do so by loading:
/Game/Levels/Island

